Creating a safe and accessible bathroom is essential for individuals with mobility challenges. A well-designed space ensures independence, comfort, and—most importantly—safety. Whether you’re modifying an existing bathroom or starting from scratch, there are key features and design elements to consider.
For those looking for professional solutions, disabled bathrooms can be customized to meet individual needs. Let’s explore how to create a safe and functional disabled bathroom that enhances accessibility and peace of mind.
1. Understanding Accessibility Needs
Before diving into the design, it’s important to assess the specific needs of the person using the bathroom. Some key considerations include:
- Wheelchair accessibility
- Support for those with limited mobility
- Safety features to prevent falls
- Ease of use for carers (if required)
Understanding these needs ensures that every aspect of the bathroom is functional and user-friendly.
2. Choosing the Right Layout
A spacious layout is crucial for a safe disabled bathroom. Ensure there’s enough room for easy movement, especially if a wheelchair or walking aid is used. Consider:
- A minimum turning space of 1500mm x 1500mm for wheelchairs
- A wide entrance (at least 900mm) for easy access
- Clear pathways between fixtures to prevent obstacles
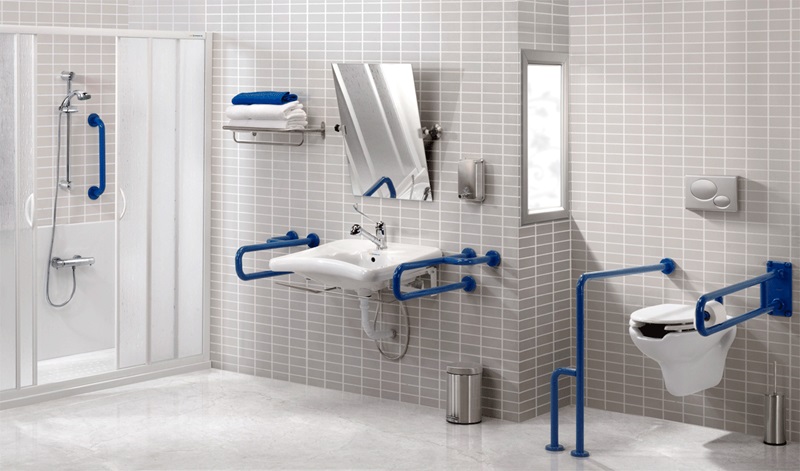
3. Installing Grab Bars for Support
Grab bars provide essential support and stability. They should be installed near the toilet, shower, and sink. Key placement includes:
- Beside the toilet for easier sitting and standing
- Inside the shower or bathtub to prevent slips
- Near the sink for additional support when washing hands or brushing teeth
Opt for sturdy, non-slip grab bars that can support significant weight.
4. Opting for a Walk-In Shower or Wet Room
Traditional bathtubs can be difficult to use for those with mobility challenges. Instead, consider:
- A walk-in shower with a level entry for wheelchair users
- A wet room design for seamless access without steps or barriers
- A fold-down seat in the shower for those who cannot stand for long
These features provide a safer, more comfortable bathing experience.
5. Choosing Slip-Resistant Flooring
Slippery floors are one of the biggest hazards in any bathroom. To enhance safety:
- Use non-slip tiles or vinyl flooring
- Avoid high-gloss tiles that become slippery when wet
- Install textured mats for extra grip in the shower area
Water-resistant and easy-to-clean surfaces also contribute to long-term bathroom maintenance.
6. Installing an Accessible Toilet
Standard toilets can be too low, making it hard to sit down and stand up. A disabled-friendly toilet should:
- Be raised to a comfortable height (around 450-480mm)
- Have grab rails on both sides for added support
- Feature a soft-close lid for ease of use
If needed, a wall-mounted or back-to-wall toilet can also save space while improving accessibility.
7. Adjusting the Sink Height and Style
A wheelchair-accessible sink should:
- Be installed at a lower height (approximately 750mm)
- Have space underneath for wheelchair users
- Feature lever-style or sensor taps for easy operation
Opting for a shallow basin also prevents unnecessary stretching.
8. Enhancing Safety with Proper Lighting
Good lighting reduces the risk of accidents. Consider:
- Bright LED lighting for clear visibility
- Motion-sensor lights for convenience
- Task lighting near mirrors and sinks
Ensure switches are easy to reach, ideally placed lower for wheelchair users.
9. Considering a Bidet for Hygiene
For individuals with limited mobility, a bidet can improve hygiene and independence. Options include:
- Bidet attachments for toilets
- Smart toilets with built-in bidets
- Handheld bidet sprayers for flexibility
These features reduce the need for assistance, promoting dignity and self-reliance.
10. Smart Technology for Extra Convenience
Technology can enhance accessibility in a disabled bathroom. Some useful features include:
- Voice-activated controls for lights and water
- Automatic soap dispensers for hygiene
- Touch-free taps and flush systems
Smart technology not only makes daily tasks easier but also adds a touch of modern convenience.
11. Ensuring Adequate Ventilation
A well-ventilated bathroom prevents moisture build-up and mold, which can create a slipping hazard. Install:
- An extractor fan to remove humidity
- A window (if possible) for natural airflow
- Moisture-resistant wall panels to prevent dampness
Proper ventilation keeps the bathroom dry and safe for daily use.
12. Hiring a Professional for Installation
While some bathroom modifications can be done DIY, professional installation ensures everything meets safety standards. Experts in disabled bathrooms can:
- Assess individual needs
- Provide custom solutions
- Ensure compliance with accessibility regulations
Investing in professional help guarantees a long-lasting and fully functional bathroom.
Final Thoughts
Designing a safe disabled bathroom requires careful planning, but the result is a space that promotes independence, safety, and comfort. From slip-resistant flooring to accessible toilets and smart technology, each element contributes to a user-friendly environment.
For those seeking expert advice and installation, exploring disabled bathrooms services can help you create a tailored space that meets your needs perfectly.